To Lecture Notes
IT 372 -- Apr 14, 2025
Specs for Projects
The numbers after each item are the amound deducted for missing this item slash ( / ) the maximum
amount deducted on this item for future projects. When you create your project, name it Proj1aSmith (replace 1a by the
actual project number and Smith by your last name).
- The name of your project should be proj1aSmith. 2.5/5
- The package that you set when creating your project can be
it372 so that the import statement at the top
of your Java files will be
import it372.proj1asmith;
0/5
- Display a title at the top of your app in a TextView
widget. Put the app title in the strings.xml
resource file. 3/5
- Choose interesting colors and layouts for your projects. We will see how to display an image in
an ImageView control today. For Project 2, you can improve your score for
creativity by adding an image to your apps. 1/10
- Extract colors and string constants to the resource files colors.xml and
strings.xml. 10/10
- Both the layout and activity files must have source code comments. 1/10
- Both the layout and activity files must have headers that look like
this:
In layout file:
<?xml version="1.0" encoding="utf-8"?>
<!-- Stan Smith
     Project 1a
     Apr 12, 2021 -->

In activity file:
// Stan Smith
// Project 1a
// Apr 12, 2021
2.5/5
- Use Android Studio to create the zipfile of your project. 2.5/5
Practice Exercises
- How does the Android app know which layout file to use?
Ans: It looks in the MainActivity.java file in the
onCreate method:
setContentView(R.layout.activity_main);
This statement
tells the activity that activity_main.xml is the layout
file.
- How do you start an Android app from the virtual device?
Ans: On the virtual device, if an app is running, click the back arrow to stop
the app. Then click in the icon for the app that you want to run.
- Click the Settings Icon >> See all ?? apps, where ?? is the actual number of
apps. >> Click on the app icon. >> Click Uninstall App.
- Look at the complete Magic8Ball Example,
complete with all 20 possible predictions.
If you have an Android phone, you may wish to install this app or other apps on your phone.
To do this, turn on
Developer options using these directions:
https://developer.android.com/studio/debug/dev-options
(You really must tap the Build Number option 7 times to enable Developer options).
Then connect your phone to your PC with a USB cable and run the app in the Emulator. This will simultaneously
install and run the app on your phone.
- Look at the section Adding a ScrollView found
below in these notes. Then display the following in a linear layout with a
scrollview.
- Display the numbers from 1 to 1000 in a textview control, one number per line.
Add a ScrollView to allow the user to swipe up and down to view all the numbers.
Answer: Here are the layout and activity files:
activity_main.xml
MainActivity.java
- Start with some Lorem Ipsum text in a textview widget:
Lorem ipsum dolor sit amet,
consectetur adipiscing elit.
In nibh lectus, accumsan
at ligula sagittis, bibendum
suscipit enim.
When the textview widget is clicked, concatenate 100 copies of this paragraph
together and display the new repeated text in the textview. Add scrollbars so the
user can see the entire textview.
Answer: Here are the layout and activity files:
activity_main.xml
MainActivity.java
strings.xml
Adding a ScrollView
Android Event Handlers
- Android event handlers can also be implemented with inner classes.
- The details are in the TempConverter Example.
- We have already seen methods 1 and 4. We looked at Method 2 last week;
let's look at Method 3 now.
- Method 1 is to use an onClick attribute in the layout file.
- Method 2 is to use an inner class to implement the click event handler.
- Method 3 is to use an anonymous inner class to implement the click event handler.
- Method 4 (recommended method) is use the setEventListener method to add an anonymous
event handler method defined with arrow notation. Unlike JavaScript that
uses a fat arrow ( => ) to define a method defined with
arrow notation, Java uses a thin arrow ( -> ).
- The View.OnClickListener class is an inner interface of the
View class.
Using Images
- To set a background image:
- Use this Blackhole Image as the background
image for an Android app.
- You can also display an image in an ImageView widget.
Project 2
The Design Editor
- The Design Editor is an alternative to directly editing the XML code that defines an Android layout.
- Use the Design editor to convert the default ConstraintLayout to a LinearLayout:
Using the Design Editor, in the Component Tree,
Right click on ConstraintLayout
>>
Select Convert view... >>
Select LinearLayout to Convert View to:
LinearLayout >>
Click Apply.
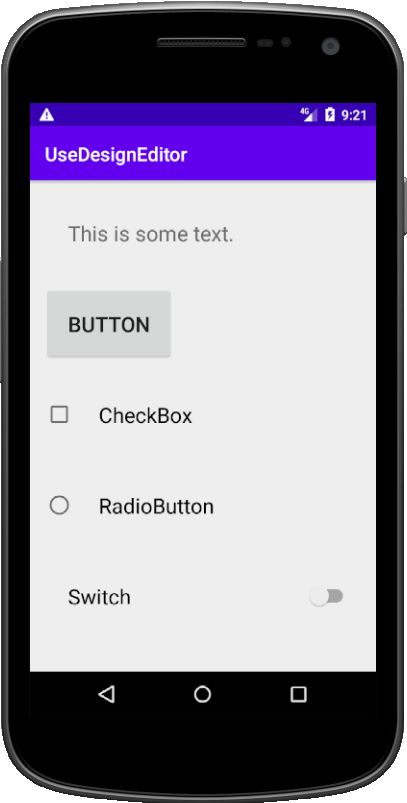
- Use the Design Editor to drag five widgets onto
a LinearLayout:
TextView Button CheckBox RadioButton
Switch
- Use the Design Editor to set these attributes of the widgets:
id text layout_marginLeft layout_marginTop
- The layout file and screen shot of the UseDesignEditor app that we worked on in class:
activity_main.xml
Screen Shot
- Use the Design Editor to create an app that converts a Celsius temperature into Fahrenheit. Enter the
Celsius temperature into an EditText widget and show the
Fahrenheit temperature in a TextView widget when a
button is clicked.
Ans: See the TempConverter Example.